Wondering if you're capable of changing your 4 stroke dirt bike jetting without messing it up? I'm here to show you that the "black art" of jetting is not as mysterious as you think.
In this article I'll break down why jetting is so important to your 4 stroke dirt bike, what jet circuits there are in the carburetor, and how to easily adjust each jet.
How do you adjust the carburetor on a 4 stroke dirt bike?
There's several different jet circuits that you can adjust, as well as other parts that can be tuned to make your 4 stroke dirt bike run better. They can be adjusted to turning a screw, changing out a small brass jet part, and moving a small clip.
This may sound complicated or intimidating, but it's actually fairly simple if you break it down into simple steps, and that's what I'm going to help you do.
![Keihin FCR Carb 2007 RMZ450 Secrets To Jetting A 4 Stroke Dirt Bike Carburetor [Beginners Guide]](https://motocrosshideout.com/wp-content/uploads/2022/03/Keihin-FCR-Carb-2007-RMZ450.jpg)
![Keihin FCR Carb 2007 RMZ450 Secrets To Jetting A 4 Stroke Dirt Bike Carburetor [Beginners Guide]](https://motocrosshideout.com/wp-content/uploads/2022/03/Keihin-FCR-Carb-2007-RMZ450.jpg.webp)
2 stroke vs 4 stroke dirt bike carb jetting
The biggest difference is that a 2 stroke carb has an air screw and a 4 stroke has a fuel screw. The 2 stroke air screw controls how much air goes into the pilot jet circuit, while the 4 stroke fuel screw controls how much fuel goes in.
The air screw and fuel screw both affect how easily the engine starts, the idle speed, and how the bike runs at 0-¼ throttle.
Why is jetting so important?
While jetting from the factory (when you buy a brand new dirt bike) is generally pretty good, there's usually some changes that you can do to make your dirt bike run better. If you ride in an uncommon climate (high elevation, cold, high humidity, etc.), then tuning the jet circuits may make a big difference.
The jetting on your 4 stroke dirt bike carburetor effects or causes:
- Starting - hot or cold
- Bogging
- Sputtering
- Throttle response - smooth or surging & unpredictable
- Spark plug fouling
- Engine performance (torque & horsepower)
- Idling - engine stays running
- Reliability
- Gas mileage
- And more
You see now that a poorly tuned carburetor can make a huge difference in how your bike runs, as well as how enjoyable your ride is. Learning to ride a dirt bike that doesn't run well makes it harder, more frustrating, and dangerous because the bike is unpredictable in how the power comes on.
What's the goal of jet tuning?
The goal is to get a proper air-to-fuel ratio so that the engine burns the fuel as efficiently as possible. The more fuel you add (bigger/richer jet), the less air will be in the mixture.
It's all about finding the best mixture or ration of air and fuel. "Perfect" shouldn't be the goal, but just by listening and feeling how the bike runs will tell you a lot.
The more you test, the more you'll learn and understand how your dirt bike works.
Jet circuits on a 4 stroke dirt bike carburetor
It depends on what type of carburetor is in your bike, but these are the most common jet circuits on a 4 stroke dirt bike carb:
- Fuel screw
- Pilot jet circuit
- Needle jet circuit
- Main jet circuit
There's also the float, accelerator pump (on some carbs), throttle slide, needle, and needle clip. These all affect the jetting and how your bike starts and runs.
![TTR125 Mikuni VM24 Carb Swap Best Bang For Your Buck 2 Secrets To Jetting A 4 Stroke Dirt Bike Carburetor [Beginners Guide]](https://motocrosshideout.com/wp-content/uploads/2020/01/TTR125-Mikuni-VM24-Carb-Swap-Best-Bang-For-Your-Buck-2.jpg)
![TTR125 Mikuni VM24 Carb Swap Best Bang For Your Buck 2 Secrets To Jetting A 4 Stroke Dirt Bike Carburetor [Beginners Guide]](https://motocrosshideout.com/wp-content/uploads/2020/01/TTR125-Mikuni-VM24-Carb-Swap-Best-Bang-For-Your-Buck-2.jpg.webp)
[Caution] Before you get started changing the jetting
Jetting is not complicated in most cases. You just have to take it one step at a time.
That's why I'm giving you this caution before you start changing any jets or circuits on your 4 stroke dirt bike carb: only make 1 change at a time.
If you do more than one thing at a time, such as changing the pilot jet and main jet, then you won't know what makes it better or worse. It's also the easiest way to make jetting frustrating because you're trying to do too much at one.
Taking one step at a time will not only make jetting easier, but you'll get a much better understanding for what's going on and how each change affects your bike.
The only time I make multiple changes at the same time is when I already have a saved jet setting that I know works.
For example: when I ride at a higher elevation I change the jets to what I know works well in my dirt bike.
Float level
The carb float level needs to be checked and adjusted first because it affects every other circuit. The float level can be changed by accidentally bending it when reinstalling the float bowl, or just getting slowly moved over time from use.
The float determines where the fuel level is in the float bowl. If the float level is too high, then all of the jet circuits will be too rich. Gas can also leak out the overflow hose with the bike in its kickstand.
If the float level is too low, then all of the jet circuits will be too lean. This will make it hard to start, run poorly and big.
Getting the float level properly set is extremely critical before changing any of the jets or fuel-screw. It's. It's not hard to do; just follow the service manual for proper float level.
For most carburetors, proper float level is when the float is parallel with the carb body when holding it upside down.
![Carb Float Height Secrets To Jetting A 4 Stroke Dirt Bike Carburetor [Beginners Guide]](https://motocrosshideout.com/wp-content/uploads/2020/06/Carb-Float-Height-960x540.jpg)
![Carb Float Height Secrets To Jetting A 4 Stroke Dirt Bike Carburetor [Beginners Guide]](https://motocrosshideout.com/wp-content/uploads/2020/06/Carb-Float-Height-960x540.jpg.webp)
Fuel screw
The fuel screw is the first step to jetting after the float is properly set. The fuel screw determines how much fuel goes through the pilot (slow) jet circuit.
This affects the starting, idle speed, and 0-¼ throttle response and power. That's why it's important to start with the fuel screw first.
Before adjusting the fuel screw, your engine needs to be fully warmed up. Tuning a cold or partially warm engine won't give you accurate results and will make re-jetting more frustrating.
How to adjust the fuel screw
The fuel screw is located on the side of the carb and requires a small, flat-blade screwdriver to adjust it. Turning the screw as little as ⅛ of a turn can make it change how the bike runs, so start out making small changes one at a time.
Turning it out (counterclockwise) opens up the fuel screw and allows more fuel in, making it run richer. Turning it out (clockwise) closes the screw and allows less fuel in, making it run leaner.
If your 4 stroke dirt bike starts and runs best between 1.5-2.5 turns out from fully closed, then you're good. If it runs best at least than 1.5 turns out then the pilot jet is too rich (big). More than 2.5 turns out means the pilot jet is too lean (small)
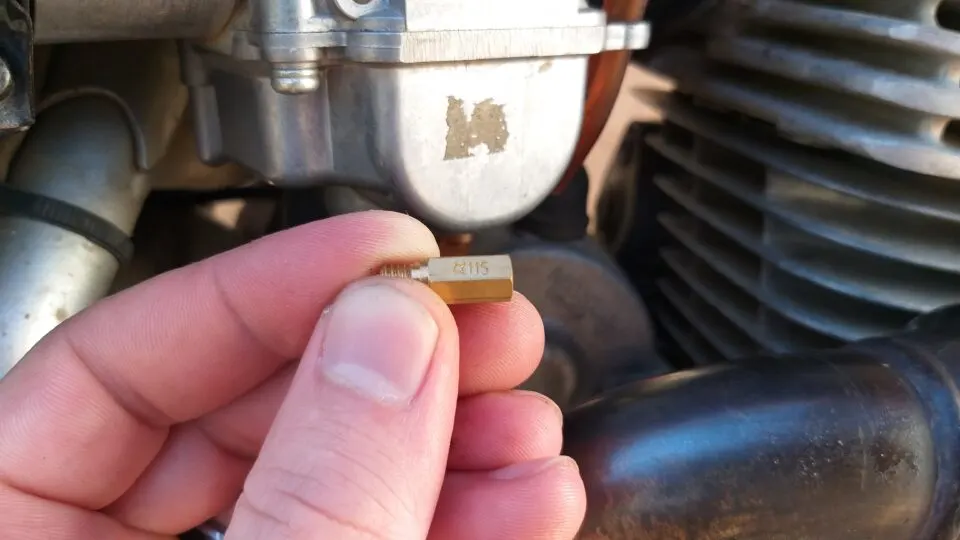
Pilot jet
The pilot jet circuit is very important because it affects the start, low-end throttle response, gas mileage and more. The pilot jet should only be changed after you have tuned the fuel screw, as we just previously covered.
How to adjust the pilot jet
The pilot jet is adjusted by changing the brass jet in the float bowl. You can do this by either rotating the carb on your dirt bike or taking it off and removing the float bowl.
Idle screw
The idle screw on a 4 stroke dirt bike carburetor simply adjusts the engine idle speed/RPM. This only needs to be adjusted after you get the fuel screw and pilot jet properly tuned.
Needle
The needle affects how your dirt bike runs from roughly ¼-¾ throttle position. Next to the pilot jet circuit, the needle jet circuit is the most important for most riders because that's where you spend most of the time riding; 0-¾ throttle position.
Most 4 stroke dirt bikes don't need to have the actual needle changed from the factory unless you have a radically modified engine. The needle clip position can usually correct most mid-range RPM jetting problems.
Needle clip position
The needle clip position determines the height of the needle jet circuit. You have to pull the slide out and carefully remove the clip. It's easiest with small needle nose pliers.
By lowering the clip, you raise the needle to make it richer. Raising the clip lowers the needle and makes it leaner.
For example, when you lower the needle, it covers the jet circuit more. This allows less fuel to get past it, which makes it run more lean.
Accelerator pump
On "pumper carbs" there is an accelerator pump. This shoots an extra amount of fuel through the carb when you turn the throttle open.
This helps prevent the dreaded 4 stroke "bog" when you whack the throttle. Carbs without an "AP" usually don't get enough gas when you turn it wide open throttle. That makes it briefly run lean and bog, which is a slight hesitation that's annoying and sometimes dangerous if you hit big obstacles.
Main jet
Finally, you have the main jet circuit in a 4 stroke dirt bike carb. This affects how your bike runs at roughly ¾ to full throttle position.

If you need peak horsepower for racing or rising up big hills, tuning the main jet can make a big difference. It also affects the reliability of your engine, especially if you're racing or riding it hard.
If the main jet is too lean, the engine will overheat and burn down faster. If it's too rich then it will run poorly and cause running issues.
What happens if the main jet is too big?
A 4 stroke with a main jet that's too big can have a variety of symptoms. These include:
- Low power
- Poor top-end throttle response
- Sputtering at high RPM
- Spark plug fouling
What happens if the main jet is too small?
Having too small of a main jet means it's running too lean. It can have symptoms such as:
- Overheats quicker
- Low top-end horsepower/runs flat
- Bogging
How to adjust the main jet
Adjusting the main jet requires removing the brass jet and replacing it with a different size. This can be done with the carb still on your bike or by removing it if there's not enough room.
Most carbs have a float bowl drain plug. Simply remove this with a 14mm or 17mm wrench (gas will pour out, so turn the petcock valve to off beforehand).
Then take a socket handle with the proper size sock (usually 6mm) and remove the brass main jet. Then simply replace it with your new one and reinstall everything else.
Caution: don't overtighten the main jet or else it will be difficult to take out the next time.
How do I know what size jet I need?
Every dirt bike is different, even if you have the same model 4 stroke as a friend. It really comes down to whatever works.
To get the correct jet size, you simply have to adjust each jet circuit one size or step at a time. If you go richer and it runs better, then keep going richer until it runs worse and then go back one. Vise-versa if you're going leaner on the jetting.
Most Common Jetting Problems For A 4 Stroke Dirt Bike
There are many different problems a 4 stroke dirt bike can have due to poor jetting, but these are the most common symptoms:
- Hard starting - hot or cold
- Overheating
- Idling high
- Hanging idle - slow to settle
- Poor throttle response/jerky/surging
- Bogging
- Sputtering
- Low power
- Spark plug fouling
What to do if rejetting has no effect
If you've tried all of the steps that I've covered in this guide, then there's a good chance that something else is causing your issue or symptom.
First, think of what you did last to your 4 stroke dirt bike. Sometimes it's as simple as fixing a problem that you accidentally caused.
If you haven't done anything to your bike, then the engine might need a rebuild. An air leak could also cause major jetting problems.
How to prevent your 4 stroke from blowing up
Jetting your 4 stroke dirt bike is just one of the easy ways to make it more reliable and last longer before needing a rebuild. I want to show you the easiest ways to make your bike last as long as possible, yet so many riders fail to do. Click here to learn more.